Tuesday 15 March 2016

DECLINE BENCH DUMBBELL FLAYS


1. Secure your legs at the end of the decline bench and lie down with a dumbbell on each hand on top of your thighs .The palms of your hand will be facing each other .

2. Once you are lying down , move the dumbbells in front of you at shoulder width . The palms of the hands should be facing each other and the arms should be perpendicular to the floor and fully extended . This will be your starting position .

3. With a slight bend on your elbows in order to prevent stress at the biceps tendon , lower your arms out at both sides in a wide arc until you feel a stretch on your chest . Breathe in as you perform this portion of the movement .

TIP:-   Keep in mind that throughout the movement , the arms should remain stationary; the movement should only occur at the shoulder joint .

4. Returns your arms back to the starting position as you squeeze your chest muscles and breathe out .

TIP:-  Make sure to use the same arc of motion used to lower the weights .

5. Hold for a second at the contracted position and repeat the movement for the per scribed amount of repetitions .

VARIATIONS:-  You may want to use a palms facing forward version for different stimulation .


BICYCLE CRUNCHES


  1. Lie flat on the floor with your lower back pressed to the ground . For this exercise , you will need  to put your hands beside your head . Be careful however to not strain with the neck as you perform it . Now lift your shoulders into the crunch position .
  2. Bring knees up to where they are perpendicular to the floor , with your lower legs parallel to the floor . This will be your starting position .
  3. Now simultaneously , slowly go through a cycle pedal motion kicking forward with the right leg and bringing in the knee of the left leg .Bring your right elbow close to your left knee by crunching to the side , as you breathe out .
  4. Go back to the initial position as you breathe in . 
  5. Crunch to the opposite side as you cycle your legs and bring closer your left elbow to your right knee and exhale .
  6. Continue alternating in this manner until all of recommended repetitions for each side have been completed .
NOTES:-  While you  cannot add resistance to this exercise you can concentrate on perfect execution and slow speed .


TRICEPS PUSH DOWN


  1. Attach a straight or angled bar to a high pulley and grab with an over head grip at shoulder width .
  2. Standing upright with the torso straight and a very small inclination forward , bring  the upper arms close to your body and  perpendicular  to the floor .The forearms should be pointing up towards the pulley as they hold the bar . This is your starting position .
  3. Using the triceps , bring bar down until it touches the front of your thighs and the arms are fully extended perpendicular top the floor . The upper arms should always remain stationary next to your torso and only the forearms should move . Exhale as you perform this movement .    
  4. After a second hold at the contracted position , bring the bar slowly up to the starting point . Breathe in as you perform this step .
  5. Repeat form the recommended amount of repetitions .

VARIATIONS:-  There are many variations to the movement . For instance you can use an E-Z bar attachment as well as a V- angled bar that allows the thumb to be higher than the small finger .Also you can attach a rope to the pulley as well as using a reverse grip on the bar exercises .  


CLOSE GRIP DUMBBELL PRESS


  1. Place a dumbbell standing up on a flat bench .
  2. Ensuring that the dumbbell stays securely placed at the top of the bench , lie perpendicular to the bench with only your shoulders lying on the surface . Hips should be below the bench and your legs bent with your feet firmly on the floor .
  3. Grasp the dumbbell with both hands and hold it straight over your chest at arm's length. Both palms should be pressing against the underside of the sides of the dumbbell . This will be starting  position .
  4. Initiate the movement by lowering the dumbbell to your chest .
  5. Return to the starting position by extending the elbows .


TOE TOUCHES CRUNCHES


  1. To begin , lie down on the floor or an exercise mat with your back pressed against the floor .Your arms should be lying across your sides with the palms facing down .
  2. Your legs should be touching each other . Slowly elevate your legs up in the air until they are almost perpendicular to the floor with a slight bend at the knees . Your feet should be parallel to the floor .
  3. Move your arms so that they are fully extended at a 45 degree angle for the floor . This is the starting position .
  4. While keeping your lower back pressed against the floor ,  slowly lift your torso and use your hands to try and touch your toes . Remember to exhale while perform this part of the exercise .
  5. Slowly begin to lower your torso and arms back down to the starting position while inhaling . Remember to keep your arms straight out pointing towards your toes .
  6. Repeat for the recommended amount of repetitions . 


LYING LEG RAISE


  1. Lie with your back flat on a bench and your legs extended in front of you off the end .
  2. Place your hands either under your gluts with your palms down or by the sides holding  on to the bench  . This will be your starting position .
  3. As you keep your legs extended , straight as possible with your knees slightly bent but locked raise your legs until they make a 90 - degree angle with the floor . Exhale as you perform this portion of the movement and hold the contracting at the top for a second .
  4. Now , as you inhale , slowly lower your legs back down to the starting position .

VARIATIONS:-  You can perform this exercise on the floor on top of an exercise mat . You can  also add weight by holding a dumbbell in between your feet as you get more advanced .


CLOSE  GRIP PULL DOWN


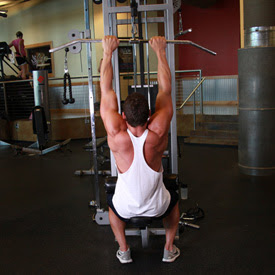
1. Sit down on a pull down machine with a wide bar attached to the top pulley . Make sure that you adjust the knee pad of the machine to fit your height . These pads will prevent your body from being raised by the resistance attached to the bar .

2. Grab the bar with the palms facing forward using the prescribed grip . Note on the grips: For a wide grip , your hands need to be spaced out at a distance winder than your shoulder width . For a medium grip , your hands need to be spaced out at a distance equal to your shoulder width and for a close grip at a distance smaller than your shoulder width .

3. As you have both arms extended in front of you - while holding the bar at the chosen grip width - bring your torso back around 30 degrees or so while creating a curvature on your lower back and sticking your chest out . This is your starting position .

4. As you breathe out , bring the bar down until it touches your upper chest by drawing the shoulders and the upper arms down and back .

TIP:- Concentrate on squeezing the back mushes once you reach the full contracted position . The upper torso should remain stationary (only the arms should be move ) . The forearms should do no other work except for holding bar ; therefore do not try to pull the bar down using the forearms .

5. After a second in the contracted position , while squeezing your shoulder blades together , slowly raise the bar back to the starting position when your arms are fully extended and the lets are fully stretched . Inhale during this portion of the movement .

6. Repeat this  motion for the prescribed amount of repetitions .


VARIATIONS:- The behind the neck variation is not recommended as it can be hard on the rotator cuff due to the hyper extension created by bringing the bar behind the neck .