Tuesday 15 March 2016

DECLINE BENCH DUMBBELL FLAYS


1. Secure your legs at the end of the decline bench and lie down with a dumbbell on each hand on top of your thighs .The palms of your hand will be facing each other .

2. Once you are lying down , move the dumbbells in front of you at shoulder width . The palms of the hands should be facing each other and the arms should be perpendicular to the floor and fully extended . This will be your starting position .

3. With a slight bend on your elbows in order to prevent stress at the biceps tendon , lower your arms out at both sides in a wide arc until you feel a stretch on your chest . Breathe in as you perform this portion of the movement .

TIP:-   Keep in mind that throughout the movement , the arms should remain stationary; the movement should only occur at the shoulder joint .

4. Returns your arms back to the starting position as you squeeze your chest muscles and breathe out .

TIP:-  Make sure to use the same arc of motion used to lower the weights .

5. Hold for a second at the contracted position and repeat the movement for the per scribed amount of repetitions .

VARIATIONS:-  You may want to use a palms facing forward version for different stimulation .


BICYCLE CRUNCHES


  1. Lie flat on the floor with your lower back pressed to the ground . For this exercise , you will need  to put your hands beside your head . Be careful however to not strain with the neck as you perform it . Now lift your shoulders into the crunch position .
  2. Bring knees up to where they are perpendicular to the floor , with your lower legs parallel to the floor . This will be your starting position .
  3. Now simultaneously , slowly go through a cycle pedal motion kicking forward with the right leg and bringing in the knee of the left leg .Bring your right elbow close to your left knee by crunching to the side , as you breathe out .
  4. Go back to the initial position as you breathe in . 
  5. Crunch to the opposite side as you cycle your legs and bring closer your left elbow to your right knee and exhale .
  6. Continue alternating in this manner until all of recommended repetitions for each side have been completed .
NOTES:-  While you  cannot add resistance to this exercise you can concentrate on perfect execution and slow speed .


TRICEPS PUSH DOWN


  1. Attach a straight or angled bar to a high pulley and grab with an over head grip at shoulder width .
  2. Standing upright with the torso straight and a very small inclination forward , bring  the upper arms close to your body and  perpendicular  to the floor .The forearms should be pointing up towards the pulley as they hold the bar . This is your starting position .
  3. Using the triceps , bring bar down until it touches the front of your thighs and the arms are fully extended perpendicular top the floor . The upper arms should always remain stationary next to your torso and only the forearms should move . Exhale as you perform this movement .    
  4. After a second hold at the contracted position , bring the bar slowly up to the starting point . Breathe in as you perform this step .
  5. Repeat form the recommended amount of repetitions .

VARIATIONS:-  There are many variations to the movement . For instance you can use an E-Z bar attachment as well as a V- angled bar that allows the thumb to be higher than the small finger .Also you can attach a rope to the pulley as well as using a reverse grip on the bar exercises .  


CLOSE GRIP DUMBBELL PRESS


  1. Place a dumbbell standing up on a flat bench .
  2. Ensuring that the dumbbell stays securely placed at the top of the bench , lie perpendicular to the bench with only your shoulders lying on the surface . Hips should be below the bench and your legs bent with your feet firmly on the floor .
  3. Grasp the dumbbell with both hands and hold it straight over your chest at arm's length. Both palms should be pressing against the underside of the sides of the dumbbell . This will be starting  position .
  4. Initiate the movement by lowering the dumbbell to your chest .
  5. Return to the starting position by extending the elbows .


TOE TOUCHES CRUNCHES


  1. To begin , lie down on the floor or an exercise mat with your back pressed against the floor .Your arms should be lying across your sides with the palms facing down .
  2. Your legs should be touching each other . Slowly elevate your legs up in the air until they are almost perpendicular to the floor with a slight bend at the knees . Your feet should be parallel to the floor .
  3. Move your arms so that they are fully extended at a 45 degree angle for the floor . This is the starting position .
  4. While keeping your lower back pressed against the floor ,  slowly lift your torso and use your hands to try and touch your toes . Remember to exhale while perform this part of the exercise .
  5. Slowly begin to lower your torso and arms back down to the starting position while inhaling . Remember to keep your arms straight out pointing towards your toes .
  6. Repeat for the recommended amount of repetitions . 


LYING LEG RAISE


  1. Lie with your back flat on a bench and your legs extended in front of you off the end .
  2. Place your hands either under your gluts with your palms down or by the sides holding  on to the bench  . This will be your starting position .
  3. As you keep your legs extended , straight as possible with your knees slightly bent but locked raise your legs until they make a 90 - degree angle with the floor . Exhale as you perform this portion of the movement and hold the contracting at the top for a second .
  4. Now , as you inhale , slowly lower your legs back down to the starting position .

VARIATIONS:-  You can perform this exercise on the floor on top of an exercise mat . You can  also add weight by holding a dumbbell in between your feet as you get more advanced .


CLOSE  GRIP PULL DOWN


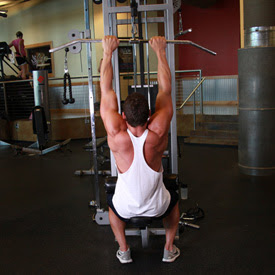
1. Sit down on a pull down machine with a wide bar attached to the top pulley . Make sure that you adjust the knee pad of the machine to fit your height . These pads will prevent your body from being raised by the resistance attached to the bar .

2. Grab the bar with the palms facing forward using the prescribed grip . Note on the grips: For a wide grip , your hands need to be spaced out at a distance winder than your shoulder width . For a medium grip , your hands need to be spaced out at a distance equal to your shoulder width and for a close grip at a distance smaller than your shoulder width .

3. As you have both arms extended in front of you - while holding the bar at the chosen grip width - bring your torso back around 30 degrees or so while creating a curvature on your lower back and sticking your chest out . This is your starting position .

4. As you breathe out , bring the bar down until it touches your upper chest by drawing the shoulders and the upper arms down and back .

TIP:- Concentrate on squeezing the back mushes once you reach the full contracted position . The upper torso should remain stationary (only the arms should be move ) . The forearms should do no other work except for holding bar ; therefore do not try to pull the bar down using the forearms .

5. After a second in the contracted position , while squeezing your shoulder blades together , slowly raise the bar back to the starting position when your arms are fully extended and the lets are fully stretched . Inhale during this portion of the movement .

6. Repeat this  motion for the prescribed amount of repetitions .


VARIATIONS:- The behind the neck variation is not recommended as it can be hard on the rotator cuff due to the hyper extension created by bringing the bar behind the neck .


Monday 14 March 2016

DEAD LIFT


  1. Approach the bar so that it is centred over your feet . Your feet should be about hip-width apart . Bend at the hip to grip the bar at shoulder -width allowing your shoulder blades to protract . Typically , you would use an alternating grip .
  2. With your feet and your grip set , take a big breath and  then lower your hips and flex the knees until your shins contact the bar  . Look forward with your head . Keep your cheat up and your back arched , and begin driving through the heels top move the weight upward .
  3. After the bar passes the knees aggressively pull the bar back , puling your shoulder blades together as you drive your hips forward into the bar .
  4. Lower the bar by bending  at the hips and guiding into the floor .


DUMBBELL BENT OVER


1. With a dumbbell in each hand (palms facing your torso ) , bend your knees slightly and bring your torso forward by bending at the waist; as you bend make sure to keep your back straight until it is almost parallel to the floor .

TIP:- Make sure that you keep the head up . The weights should  hang directly in front of you as your arms hang perpendicular to the floor and your torso . This is your starting position .

2. While keeping the torso stationary , lift the dumbbells to your side (as you breathe out ) , keeping the elbows close to the body (don't extra any force with the forearm other than holding the weights) . On the top contracted position , squeeze the back muscles and hold for a second .

3. Slowly the lower the weight again to the starting position as you inhale .

4. Repeat for the recommended amount of repetitions .

CAUTION:-

1. This exercise not recommended for people with back problems . A row pulley row is a better choice for people with back issues .

2. Ensure perfect form and never round the back as this can promote back injury .

3. Be cautions with the weight used ; in case of doubt , use less weight rather  than more .

VARIATIONS :-You can perform the same exercise using a low pulley instead with a v- bar or with barbell . This exercise can be also performed with  natural grip . 

HYPER EXTENSION


1. Lie face down in hyper extension bench , tucking your ankles securely under the footpads .

2. Adjust the upper pad if possible so your upper things lie flat across the wide pad , leaving enough  room for you to bend at the waist without any restriction .

3. With your body straight , cross your arms in front of you or behind your head . This will be your starting position  .

TIP:- You can also hold a weight plate for extra resistance in front of you under your crossed arms .

4. Start bending forward slowly at the waist of for as you can while keeping your back flat . Inhale as you perform this movement . Keep moving forward until you feel a nice stretch on the hamstrings and you can no longer keep going without a rounding of back .

TIP:- Never round the back as you perform this exercise . Also , some  people can  go farther then  others . The key thing is that you go as for as your body allows you to with out around the back .

5. Slowly raise your torso back to the initial position as you inhale .

TIP:- Avoid the temptation to arch your back past a straight line . Also do not swing the torso at any time in order to protect the back from injury .

6. Repeat form the recommended amount of repetitions .

VARIATIONS:- This exercise can also be performed without a hyper extension bench ,  but in this case you will need a spotter . Also a similar exercise to this one is the good miming and the stiff legged dead lift .  

REVERSE DEAD LIFT


  1. Set the bar at a power rack . Attach bands to the top of the rack , using either bands pegs or frame itself . Attach the other end of the bands to the bar .
  2. Approach the bar so that it is centred over your feet . You feet should be about hip width apart . Bend at the hip to grip the bar at shoulder width , allowing your shoulder blades to protract . Typically , you would use an over hand grip or an over/under grip on heavier sets .
  3. With your feet , and your grip set , take a big breath and then lower your hips and bend the knees until your shins contact the bar . Look forward width your head , keep your chest up and your back arched , and begin driving through the heels to move the weight upward .
  4. After the bar passes the knees , aggressively pull the bar back , pulling your shoulder blades together as you drive your hips forward into the bar .
  5. Lower the bar by bending at the hips and guiding in to the floor .


Friday 11 March 2016

LYING TRICEPS EXTENSION


1. While holding a barbell with a grip with palms facing forward , lie on your back on a flat bench with your head close to the end of the bench .

2. Extend your arms in front of you and slowly bring the bar back in a semi circular motion to a position over your head . At the end of this step your arms should be overhead and parallel to the floor . This will be your starting position .

NOTE:- Keep your elbows in at all times .

3. As you inhale , lower the bar by bending at the elbows and while keeping the upper arm stationary . Keep lowering the bar until your forearms are perpendicular to the floor .

4. As you exhale bring the bar back up to the starting position by pushing the bar up in a semi-circular motion until the lower arms are also parallel to the floor . Contract the triceps hard at the top of the movement for a second .

NOTE:- Only the forearms should move . The upper arms should remain stationary at all times.

5. Repeat for the recommended number of repetitions .

Thursday 10 March 2016

HAMMER CURLS


1. Stand up with a dumbbell in each hand being held at arms length . The elbows should be close to the torso .

2. The palms of the hand should be facing your torso . This will be your starting position .

3. While holding the upper arm stationary , curl the right weight forward while contracting the biceps as you breathe out . Continue the movement until your biceps is fully contracted and the dumbbells are at shoulder level . Hold the contracted position for a second as you squeeze the biceps .

NOTE:- Only the forearms should move .

4. Slowly begin to bring the dumbbells back to starting position as your breathe in .

5. Repeat the movement with the left hand . This equals one repetition .

6. Continue alternating in this manner for the recommended number of repetitions . 

CONCENTRATION CURL


1. Sit down on a flat bench with one dumbbell in front of you between your legs . Your legs should be spread with your knees bent and feet on the floor .

2. Use your right arm to pick the dumbbell up . Place the back of your right upper arm on the top of your inner right thigh . Rotate the palm of your hard until it is facing forward away from your thigh . This will be your starting position .

3. While holding the upper arm stationary , curl the weights forward while contracting the biceps as you breathe out . Only the forearms should move . Continue the movement until your biceps are fully contracted and the dumbbells are at shoulder level .

NOTE:- At the top of the movement make sure that the little finger of your arm is higher than your thumb . This guarantees a good contraction . Hold the contracted position for a second as you squeeze the biceps .

4. Slowly begin to bring the dumbbells back to starting position as your breathe in .

PRECAUTION:- Avoid swinging motions at any time .

5. Repeat for the recommended number of repetitions . Then repeat the movement with the left arm .  

CLOSE GRIP BARBELL CURL


1. Stand up with your torso upright while holding an E-Z curl bar at the closer inner handle . The palm of your hands should be facing forward and they should be slightly tilted inwards due to the shape of the bar . The elbows should be close to the torso . This will be your starting position .

2. While holding the upper arms stationary , curl the weights forward while contracting the biceps as you breathe out .

NOTE:- Only forearms should move .

3. Continue the movement until your biceps are fully contracted and the bar is at  shoulder level . Hold the contracted position for a second and squeeze the biceps hard .

4. Slowly begin to bring the bar back to starting position as your breathe in .

5. Repeat for the recommended number of repetitions .  

BAR PREACHER CURL


1. To preform this movement you will need a preacher bench and an E-Z bar . Grab the E-Z  curl bar at the close inner handle .

2. The palm of your hands should be facing forward and they should be slightly tilted inwards due to the shape of the bar .

3. With the upper arms positioned against the preacher bench pad and the chest against it , hold the E-Z curl bar at shoulder length . This will be your starting position .

4. As you breathe in , slowly lower the bar until your upper arm is extended and the biceps is fully stretched .

5. As you exhale , use the biceps to curl the weight up until your biceps is fully contracted and the bar is at shoulder height . Squeeze the biceps hard and hold this position for a second .

6. Repeat for the recommended number of repetitions . 

SEATED CABLE ROWING


1. For this exercise you will need access to a low pulley row machine with a V-bar .

NOTE:-  The V-bar will enable you to have a neutral grip where the palms of your hands face each other . To get into the starting position , first sit down on the machine and place your feet on the front platform or crossbar provided making sure that your knees are slightly bent and not locked .

2. Lean over as you keep the natural alignment of your back and grab the V-bar handles .

3. With your arms extended pull back until your torso is straight .

4. Keeping the torso stationary , pull the handles back towards your torso while keeping the arms close to it until you touch the abdominals .

5. Repeat for the recommended number of repetitions .


PULL DOWN BEHIND NECK


1. Sit down on a pull-down machine with a wide bar attached to the top pulley . Make sure that you adjust the knee pad of the machine to fit your height . These pads will prevent your body from being raised by the resistance attached to the bar .

2. Grab the bar with the palms facing forward .

3. As you have both arms extended in front of you holding the bar at the chosen grip width , bring your torso and head forward . Think of an imaginary line from the center of the bar down to the back of your neck . This is your starting position .

4. As you breathe out , bring the bar down until it touches the back of your neck by drawing the shoulders and the upper arms down and back .

NOTE:- Concentrate on squeezing the back muscles once you reach the full contracted position . The upper torso should remain stationary and only the arms should move . The forearms should do no other work except for holding the bar; therefore do not try to pull down the bar using the forearms .

5. After a second on the contracted position squeezing your shoulder blades together , slowly raise the bar back to the starting position when your arms are fully extended and the lats are fully stretched . Inhale during this portion of the movement .

6. Repeat this motion for the recommended number of repetitions .

T-BAR ROWING


1. Load up the T-bar row machine with the desired weight and adjust the leg height so that your upper chest is at the top of the pad .

NOTE:- In same machines all you can do is stand on the appropriate step that allows you top be at a height that has the upper chest at the top of the pad .

2. Lay face down on the pad and grab the handles . You can either use a palms down , palms up or palms in position depending on what part of your back you want to emphasize .

3. Lift the bar off the rack and extend your arms in front of you . This will be your starting position .

4. As you exhale slowly pull the weight up and squeeze your back at the top of the movement .

NOTE:- Keep the upper arms as close to the torso as possible throughout the movement  in order to better engage the back muscles . Also , do not lift your body off of the pad at any time and refrain from using the biceps to lift the weight .

5. After a second contraction at the top of the movement , as you inhale , slowly go back down to the starting position .

6. Repeat for the recommended number of repetitions .  


SINGLE ARM ROWING


1. Choose a flat bench and place a dumbbell on each side of it .

2. Place the right leg on top of the end of the bench , bend your torso forward from the waist until your upper body is parallel to the floor , and place your right hand on the other end of the bench for support .

3. Use the left hand to pick up the dumbbell on the floor and hold the weight while keeping your lower back straight . The palm of the hand should be facing your torso . This will be your starting position .

4. Pull the resistance straight up to the side of your chest , keeping your upper arm close to your side and keeping the torso stationary . Breathe out as you perform this step .

NOTE:-  Concentrate on squeezing the back muscles once you reach the full contracted position . Also , make sure that the force is performed with the back muscles and not the arms .

5. Finally , the upper torso should remain stationary and only the arms should move . The forearms should do no other work except for holding the dumbbell . Therefore do not try to pull the dumbbell up using the forearms .

6. Lower the resistance straight down to the starting position . Breathe in as you perform this step .

7. Repeat the movement for the recommended number of repetitions . Switch sides and repeat again with the other arm .

REVERSE GRIP BENT OVER


 1. Stand erect while holding a barbell with a supinated grip (palms facing grip) .

 2. Bend your knees slightly and bring your torso forward , by bending at the waist , while keeping the back straight until it is almost parallel to the floor .

NOTE:- Make sure that you keep the head up .

3. The barbell should hang directly in front of you as your arms hang perpendicular to the floor and your torso . This is your starting position .

4. While keeping the torso stationary , lift the barbell as you breathe out , keeping the elbows close to the body  and not doing any force with the forearm other than holding the weights . On the top contracted position , squeeze the back muscles and hold for a second .

5. Slowly lower the weight again to the starting position as you inhale .

6. Repeat the recommended number of repetitions . 


PULL UPS


  1. Deadhangs for time (i.e.,holding the bottom position with elbows locked and shoulder packed for time ) . Move on to stage two if / when you can hold a deadhang for at least 30 seconds .
  2. Flexed- arm hangs for time (i.e., holding the top position with chin over the bar for time ) . Move on to stage there if / when you can hold a flexed -arm hang for at least 30 seconds.
  3. Negative reps (i.e., the eccentric"lowering"portion of the pull -up / chain up ) . Move onto stage four if / when you can perform 5 negative reps with a slow descent(i.e.,3+seconds per rep) .
  4. Assisted reps slow negatives (i.e., performing full range of motion pull -up /chine- up reps with assistance from a partner , resistance band , jump , etc ) . Move on to stage five if / when you can performed 10 assisted reps .
  5. Full pull -ups or chin -ups . Graduate from the program when you can complete 5 reps with excellent technique .


CABLE BICEPS CURL


  1. Stand up with your torso upright while holding a cable curl bar that is attached to a low pulley . Grab the cable bar at shoulder width and keep the elbows close to the torso . The palm of your hands should be facing up . This will be your starting position .
  2. While holding the upper arms stationary , curl the weights while contracting the biceps as you breath out . Only the forearms should move . Continue the movement until your biceps are fully contracted  and the bar is at shoulder level .Hold the contracted position for a second as you squeeze the muscle .
  3. Slowly begin to bring the curl bar back to starting position as your breath in .
  4. Repeat for the recommended amount of repetitions .
               VARIATION:-
                                          You can also perform this movement using an E-Z barbell attachment or single handles . 


CROSS CABLE


  1. To get yourself  into the starting position , place the pulleys on a high position (above your head) select the resistance to be used and hold the pulleys in each head .
  2. Step forward in front of an imaginary straight line between both pulleys while pulling your arms together in front of you . Your torso should have a small forward bend from the waist . This will be starting position .
  3. With a slight bend on your elbows in order to prevent stress at the biceps tendon , extend your arms to the side (straight out at both sides ) in a wide arc until you feel a stretch on your chest . Breathe in as you perform this portion of movement .
  4. Return your arms back to the  starting position as you breath out . Make sure to use the same arc of motion used to lower the weights .
  5. Hold for a second at the starting position and repeat the movement for the prescribed amount of repetitions .

VARIATIONS:-
                              You can very the point in front of you where your arms meet .


LEG EXTENSION


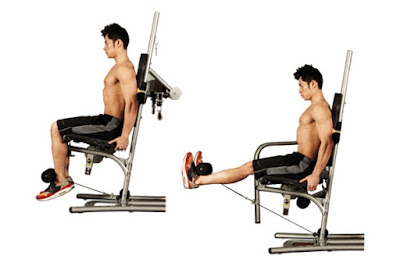
  1. Sit on the padded seat of the machine .
  2. Hook the feet under the padded bar . Adjust the bar so that it rests comfortably at the lower end of the leg , above the feet.
  3. Adjust the machine so that your legs are at a 90- degree angle . Don't perform the exercise less than a 90- degree angle , because this place the knees beyond the toes , which stresses the knee and can result in injury.
            NOTE:-  If the machine in your gym does not have leg length adjustment , don't use it ; a poorly adjusted position can apply force in improper places in the legs and knees , which can lead to injury.

    4. Choose a weight that enables you to extend the legs straight with effort but not too much strain .Initially , select a light weight from the stack . Do not use this exercise to test your maximum leg strength , as the stresses the knee and can cause injury .

   5. Grip the bars firmly at each side . Hold your head steady . Brace , and breathe out on exertion and in on recovery .

  6. Extended your legs , pushing with your quadriceps to lift the weighted bar . Pause at the top of the extension .

  7. Slowly lower the weight back to the starting position .

   8. Repeat the exercise , doing 2 to 3 sets of  8 to 12 repetitions each .


DUMBBELL SHOULDER PRESS


  1. While holding a dumbbell in each hand sit on a military press bench or utility bench that has back support . Place the dumbbells upright on top of your thighs.
  2. Now raise the dumbbells to shoulders height one at a time using your thighs to help propel them up into position.
  3. Make sure to rotate your wrists so that the palms of your hand are facing forward . This is your starting position.
  4. Now , exhale and push the dumbbells upward until they touch at the top .
  5. Then , after a brief pause at the top contracted position , slowly lower the weights back down to the starting position while inhaling.
  6. Repeat for the recommended amount of repetitions.
     
       VARIATIONS:-  You can perform the exercise standing or sitting on a regular flat bench . For people with lower back problems , the version  described is the recommended one .

                                         You can also perform the exercise as Arnold Schwarzenegger used to do it , which is to start holding the dumbbells with a supinated grip (palms facing  you) in front of your shoulders and then , as you start pushing up . You align the dumbbells  in the starting position described on step 3 by rotating your wrists and touch the dumbbells at the top . As you come down , then you would go back to the starting position by rotating the wrist throughout the lowering portion until the palms of your hand are facing you . This variation is called the Arnold press . However , it is not recommended if you have rotator cuff problems.


Wednesday 9 March 2016

CLOSE GRIP EZ -BAR BENCH PRESS


  1. Lie back on a flat bench . Using a close grip (around shoulder width), lift the bar from the rack and hold it straight over you with your arms locked . This will be your starting position.
  2. As you breathe in, come down slowly until you feel the bar on your middle chest .
            TIP:- Make sure that as  opposed to a regular bench press , you keep the elbows close to the torso at all times in order to maximum triceps involvement.

      3. After a second pause , bring the bar back to the starting position as you breathe out and push the bar using your triceps muscles . Lock your arms in the contracted position , hold for a second and then start coming down slowly again .

           TIP:- It should take at least twice as long to go down than to come up .

     4. Repeat the movement for the prescribed amount of repetitions.

      5. When you are done , place the bar back in the rack .


CAUTION:-  If you are new at this exercise , it is advised that you use a spotter . If no spotter is available , then be conservative with the amount of weight used . Also beware of  letting the bar drift too for forward . You want the bar to fail on your middle chest and nowhere else.

VARIATIONS:- This exercise can also be performed with an e-z bar using the inner handles as well as dumbbells , in which case the palms of the hands will be facing each other.


DUMBBELL ONE ARM TRICEPS EXTENSION


  1. Grab a dumbbell and either sit on a military press bench or a utility bench that has a back support on it as you place the dumbbells up right on top of your thighs or stand up straight.
  2. Clean the dumbbell up to bring it to shoulder height and then extend the arm over your head so that the whole arm is perpendicular  to the floor and next to your head . The dumbbell should be on top of you. The other hand can be kept fully extended side , by the waist , supporting upper arm that has the dumbbell or grabbing a fixed support.
  3. Rotate the wrist so that the palm of your hand is facing forward and the pinkie is facing the ceiling . This will be your starting position.
  4. Slowly lower the dumbbell behind your head as you hold the upper arm stationary . Inhale as you perform this movement and pause  when your triceps are fully stretched.
  5. Return to the starting position by flexing your triceps as you breathe out .
                  TIP:- It is imperative that only the forearm moves . The upper arm should remain at all times stationary next to your head.

     6. Repeat for the recommended amount of repetitions and switch arms.

                  VARIATIONS:- You can also do this using a rope instead of a dumbbell.


SNATCH SHRUG


  1.    Begin with a wide grip , with the bar hanging at the mid thing position . You can  use a hook or overhand grip . Your back should be straight and inclined slightly forward.
  2. Shrug your shoulders towards your ears . While this exercise can usually by loaded with heavier weight than a snatch, avoid the overloading to the point that the execution slows down.
  3. Repeat the movement for the prescribed amount of repetitions.


SMITH MACHINE BACK SHRUGS


  1. With the bar at thigh level , load an appropriate weight.
  2. Stand with the bar behind with you , taking a shoulder width , pronated grip on the bar and unhook the weight. You should be standing up straight with your head and chest up and your arms extended. This will be starting position.
  3. Initiate the movement by shrugging  your shoulders straight up . Do not flex the arms or wrist during the movement.
  4. After a brief pause return the weight to the starting position.
  5. Repeat the movement for the prescribed amount of repetitions.


Friday 4 March 2016

BARBELL SHOULDER PRESS


1.  Sit on a bench with back support in a squat rack. Position a barbell at a height that is just above your head. Grab the barbell with a pronated grip (palms facing forward).

2.  Once you pick up the barbell with the correct grip width , lift the bar up over your head by locking your arms. Hold at about shoulder level and slightly in front of your head . This is your starting position.

3.  Lower the bar down to the shoulders slowly as you inhale.

4.  Lift the bar back up to the starting position as you exhale.

5.  Repeat for the recommended number of repetitions.


BARBELL SQUAT


1.  This exercise is best performed inside a squat rack for safety purposes . To begin , first set the bar on a rack just above shoulder level. Once the correct height is chosen and the bar is loaded, step under the bar and place the back of your shoulders across it.

2.  Hold on to the bar using both arms at each side and lift off the rack by first pushing with your legs and at the same time straightening your torso.

3.  Step away from the rack and position your legs using a shoulder- width medium stance with the toes slightly pointed out . Keep your head up at all times and maintain a straight back. This will be your starting position.

4.  Begin to slowly lower the bar by bending the knees and sitting back with your hips as you maintain a straight posture with the head up . Continue down until your hamstrings are on your calves . Inhale as you perform this portion of the movement.

5.  Being to raise the bar as you exhale by pushing the floor with the heel or middle of your foot as you straighten the legs and extend the hips to go back to the starting position.

6.  Repeat for the recommended number of repetitions.